In a previous entry, the Thirdwalling crew examined the role of the Game Master Screen and the barrier it can pose to effective communication at the game table. This week, we’ll take a look at the basic construction methods of building a custom screen for use in your game. This screen is fairly basic, but we will discuss some options that the Thirdwalling staff has explored on other custom screens that could benefit you at the table as well! Fair warning: This is a picture-heavy article as it contains a picture-tutorial of construction.
This tutorial outlines building the shorter, shelved screen like the type pictured in the Communication Barrier article. By request of Da Ogre (who is likely to be the primary user of this screen), it is slightly wider and about an inch shorter than the other. Some additional improvements were made to hide the corrugation on the cardboard edges and a fancier paint job was applied. We’ll cover more of that below.
Materials Needed:
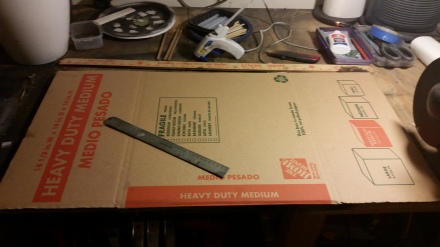
Cardboard Box – Shown is a Medium-sized heavy-duty cardboard box from Home Depot (cost $1.50).
Hot Glue or White Glue – For this I used hot glue, but white glue seems to hold up better.
Masking Tape – Shown is Blue Painter’s Tape. (Optional).
Whatever paint or finish you decide to apply.
Tools Needed:
Sharp Box Cutter – The sharper the better.
Ruler and/or Yard Stick – Metal ones are less likely to get shredded by your blade. Wooden Yard Stick too!
Scissors – The sharper the better.
Glue Gun – If you’re not using white glue.
Paint Brushes – For both the white glue and your finish.
Let’s get started! Sorry for the quality of some of these pictures, I work in my garage and use my phone as my camera!
Step 1.) Cut one of the sides off the box, until you’re left with 1/4 of the box, with the tabs that would be the lids of the box on either end. You’ll use those creases to make the bend in your screen:
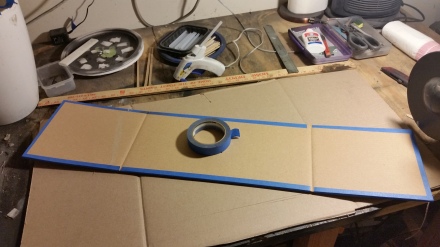
Step 2.) Trim the cardboard down to the size that you want. In this case, I chose to make it 7.5 inches tall and I left the tabs full sized. You want to cut this in such a way that the creases for the lid tabs are intact. On my personal screen, I trimmed the tabs down to about half their normal size, but Da Ogre wanted a wider screen so I left the tabs full sized.
Step 2A.) Optional – Use the masking tape to cover all the edges to hide the corrugation in the final project.
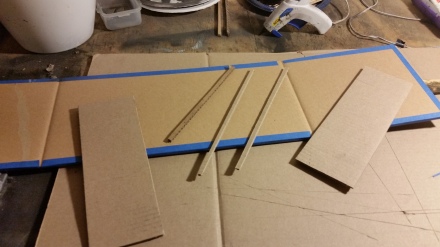
Step 3.) From the remaining cardboard of this side of the box, cut out any shelves that you’ll want on the final product. Here I cut two shelves just a bit longer than the lid tabs on the box and 3″ wide. That’s wide enough to fit a note card (or a post-it) without being so wide that it covers whatever you’ve got on the table under the shelf. I also cut three 1/4″ wide strips to go around the edges of the shelf. These strips will keep pencils and dice from falling off the shelves as you’re using the screen.
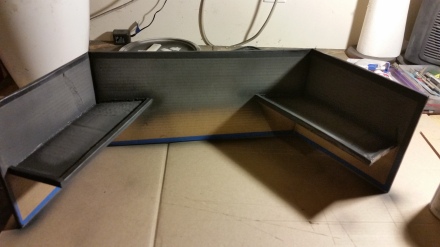
Step 4.) Glue on the shelves. Stand the screen on edge and set the lid tabs to the angle that you like. This is really up to personal preference but I kept a bit of a wider stance here as the user wanted a wider screen. Transfer that angle to the shelves and cut them. A close observer can see here that I cut a bit too much off the shelves, so there’s a gap between the end of the shelve and the edge of the screen. I don’t mind this, but measure twice, cut once!
Step 5.) Edge the shelves. I glued on the little lip around the edge of the shelf and taped over all the corrugation to hide it. It just makes for a cleaner look when you’re done – not really necessary.
Step 5A.) While I was painting it (Step 6) I noticed that the shelves on this one were a bit wobbly. I cut these little cardboard triangles and hot-glued them in place (covering the corrugation with blue tape, as before) then painted over them as well. This gave the shelf a surprising amount of strength. I didn’t measure the triangles, but they were only about an inch on the two sides.
Step 6.) Prime it. In accordance with the holy teachings of The DMG all cardboard gets a full coat of black spraypaint before I go forward.
Step 7.) Paint and Finish. Realistically, you could leave it with the primer coat and it’d look fine. Most commercial screens have cool artwork on the outside, so you could glue on some print-outs (or hand paint something if you’re talented). When it comes to finish, the sky’s the limit! If you do something cool with yours, send me a picture and we’ll feature it on Thirdwalling!
For this one, after coating the entirety in black primer, I painted it with gray magnetic primer, then used a dry brush to paint on the crimson color over that, letting the gray show through. Then I painted over THAT with a crackle finish to give it a “weathered” look. Then three coats of clear to give it gloss. The pictures here are really bad, the effect it produced looks like old wood in person.
Some Options to Consider:
After I built the prototype screen featured in the older post, I got a lot of great ideas from people on how they’d like to see it used. I tried a few with varying degrees of success:
Magnetic Primer – The idea here was to be able to use the markers from the Pathfinder Combat Pad right on the screen. I painted the above with that magnetic primer and the magnets don’t stick to it at all. If you have a brand of magnetic primer that works, I still think this is a great idea, but instead I’ll probably just prop the Combat Pad between the shelves.
Chalkboard / Whiteboard Paint – Painting the front or back sides of the screen with whiteboard or chalkboard paint would let you write directly on it for taking notes, tracking initiatives, etc. I don’t use mine that way, but I’d love to see pictures if you decide to!
More Shelves – I tried a prototype that had the shelf extend across the front panel as well, and I found it got in the way more than it was helpful. If you use the shelves frequently, more might be better. I wouldn’t try to put more than one shelf per panel of the screen, though, as there isn’t really enough room.
Charts and Graphs – If you’re using the screen only for a specific game system, you might print out some useful charts and graphs to emulate store-bought screens. I never use those anyway so I don’t include them on my screens but I’m really excited to see what others come up with. Just print them out on your inkjet (or better, laser) printer and use spray adhesive to stick them to the screen. To make it more durable I’d probably paint a Puzzle Saver like Modge Podge (or just a few coats of white glue) over the top to seal the paper a bit.
Dice Towers – For those that use towers, I’ve considered turning one of the panels into two dice towers – one on the inside for “private” rolls and one on the outside for “public” ones. I’m still experimenting with making these towers, but look for a future update with instructions there that you could use to include dice towers right into your screen! If you beat me to it, send the picture and I’ll feature you in that article!
Got your own ideas? Put them in the comments below! If you send pictures of your home-made screens I may feature them in a future Thirdwalling article. Got questions about construction? Put it in the comments!
If you liked this article and want to see more like it, please go to Thirdwalling.wordpress.com and click the “Follow” link at the top right. This lets us know that you enjoyed our work and helps us shape future content for the blog!


Pingback: Dice Towers – Useful Tool or Gaming Gadget? | Thirdwalling
Fat Dragon games has a pretty decent generic GM screen that looks like castle walls. It has a shelf in the center area propped up by two towers. Both towers act as dice towers, one facing the players and one facing the GM.
Looking at pictures on Google Images of that Fat Dragon tower. That’s pretty impressive! My only complaint with it would be the towers don’t have trays at the bottom – so the dice could still go wild through the miniatures!
Pingback: Crafting Series – Custom Dice Tower | Thirdwalling
i made a custom ‘landscape’ screens (3 x A4) for my pathfinder game – rather than use corrugated card, i used the card from two monopoly boards that i picked up in a charity shop for £1 each
Great idea on reusing old board games for the screens! I’m not sure I could do that, though – Leg Up likes board games too much to let me cut them up.