Last week, we examined some guidelines to using dice towers. In that article, we made the recommendation that users make their own towers rather than springing for the available store bought. While there are quite a few great plans out on a simple web search for making these simple gadgets, once again we will put our money (all $2.00 of it) where our mouths are and show how to create a custom dice tower. This step-by-step tutorial shows how to lay them out and glue them up, and offers suggestions for improving our simple design!
I made this tower in a few hours as a side-project to test out some loaded dice that I’m making as an experiment. I kept it really simple, and donated the towers to my local game shop when I was done with them. So they’ll sit on the shelf at the store until they’re used and won’t be moved around much unless Da Ogre decides I’m cluttering up the joint and torches them.
Materials Needed:
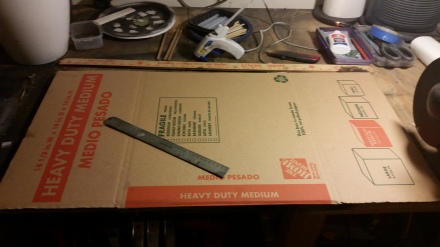
Cardboard Box – Shown is a Medium-sized heavy-duty cardboard box from Home Depot (cost $1.50).
Hot Glue or White Glue – For this I used white glue, but you could use hot glue. White glue is much more forgiving and seems to hold cardboard better.
Masking Tape – Shown is Blue Painter’s Tape. (Optional). Holds it all together while the glue dries and hides the corrugation.
Whatever paint or finish you decide to apply.
Tools Needed:
Sharp Box Cutter – The sharper the better.
Ruler and/or Yard Stick – Metal ones are less likely to get shredded by your blade. Wooden Yard Stick too!
Scissors – The sharper the better.
Glue Gun – If you’re not using white glue.
Paint Brushes – For both the white glue and your finish.
Let’s get started!
Step 1.) Cut the box into quarters. You’ll use 1/4 of the box for this project.

More and more of my construction projects lately start with 1/4 of a Heavy Duty Medium box from Home Depot
Step 2.) Layout the parts on the box. My towers are 10″ tall and 10″ wide from the back of the tower to the front of the dice tray. That leaves the tower itself 5″ wide with a 5″ dice tray sticking out the front. I’ve done two towers now, one was 2 1/2″ wide and the other was 3 1/2 inches wide. The 3 1/2″ wide box is far more stable and less likely to get knocked over into your miniatures so I recommend it. If you’re doing a more narrow tower, you could put some weights in the bottom with washers or the like.
Don’t feel like you have to use this design. I’ve seen some great designs of castles, houses, even dragons and caves. Get creative with your design! A Facebook user I saw made one that looked like Castle Grayskull and I’m very jealous. If you come up with a fun design, show it to us and I’ll feature it in an upcoming post on Thirdwalling!
Step 3.) Glue on the bottom and the back. These two parts are crucial to measuring and cutting the baffles as well as keeping the whole thing square. I glued mine with white glue and put tape along the joint to both hide the corrugation and hold the white glue while it dried. I let it sit for about an hour to dry before I continued because these were the foundation that the whole thing depends on to be straight and square.
ProTip – I glued the bottom baffle in place in this step to keep the wall and floor square to each other. But that baffle is far, far, far too short. I thought doing a sharp angle on it would be sufficient to kick the dice out into the tray and it simply is not. After I got the tower glued together and tested, I replaced that bottom baffle with a much longer one that seems to do a better job of getting the dice out into the tray rather than stalling out inside the tower!
Step 4.) Glue on the front of the box. I could have done this with the last step but I neglected to. I taped it in place after gluing with white glue and let it dry for an hour afterward.
Step 5.) Glue on the top-most baffle. This one is mostly aesthetic, to keep prying eyes from peering down into your dice tower and learning its secrets. I made mine much shorter than the other baffles in the project to ensure I had clearance and set it in there on a 45 degree angle.
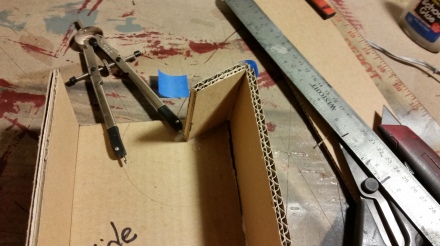
You can see that I used a compass set at 2″ to ensure I had enough clearance even for moderately sized dice to move around in there. After I set the first baffle I drew a circle out from the end, and my next baffle rode along the underside of that curve to ensure good clearance all the way around.
Protip – Don’t forget that the other side is going to have to fit down between the front and back, so you’ll need to cut your baffles a bit shorter than flush. I remembered to do this after I’d glued all my baffles in, and that made it a chore. Cut them shorter first and you won’t have to worry about it after the glue’s dried.
Step 6.) Glue the other baffles in the same way. Again, use the compass to ensure a 2″ clearance all the way around. I’m sure there’s a lot of math that goes into setting the angles on these baffles, but I just eyeballed it. Just make sure the angle is sharp enough that the dice will hit it and bounce away, and not be inclined to stop there. Think baffle, not shelf. If you’re not sure, there are some great plans online that you can print out.
Step 7.) Attach the other side and the front of the tray, then tape all the seams. Don’t get too crazy with the glue, but you want everything to be good and solid. The tape helps hide the corrugation for a cleaner finished look, but it is not strictly necessary.
Protip – Before you glue on the side and seal up the box, paint the inside! I neglected to do this, and raw cardboard is visible if you peer in through the top or the mouth of the tray. That makes the whole project look unfinished. In keeping with the teachings of DM Scotty over at The DM’s Craft I paint everything flat black (or sometimes flat white, if I’m going for a lighter final finish) before I finish it. This includes the bottoms of my terrain and should have included the insides of my tower. It makes for a cleaner final product visually.
Step 8.) Finish and paint to your liking.
I used a drybrush and crackle finish that I’ve been using on arts and crafts projects since I was a young’un. My mother taught me the technique, actually. I’m sure she’s very proud to see my applying it to nerdy pursuits!
Some things to consider:
After I built them, I was given some suggestions for alternatives to the design. Some, I covered in my subtle “Protips” above, but some others might be:
Wood or foam board – If I was going to be hauling these to the game shop every week I probably would have made them from foam board. If this was something I’d be displaying in my game room at the house I might even have made them from wood and stained/painted them instead of cardboard. Either way, even double-layer cardboard is not hugely durable, so if you’re going to be transporting them consider a more durable material.
Plexiglass – If I’m really feeling industrious, I might make the next set from colored plexiglass. That’d be a cool look and still be fairly cheap if I was careful in my layouts. The Ginger even suggested that a fancy stained-glass tower might be fun!
Dice Tower in GM Screen – As I mentioned in our recent GM Screen article it might be cool to build this right into a custom GM screen. A lot of comments I received on Facebook and G+ suggested this as well. Certainly worth a go if you’re into that.
Bigger/different dice tray at the bottom – If I was doing this again, one thing I would certainly change is the dice tray at the bottom. It was sufficient for my needs, but I would like to have it be much bigger if I was going to use it regularly. Cutting the sides on the seam of the box would allow you to bend the sides out at a 45 degree angle (or more!) from the tower, and put a longer front on for a triangular box in the front. I might make one like this and but a curved front on it in a future project just for fun.
Lower walls on the tray – The lip around the dice tray on this one is 2″ tall. That catches the dice well, but it gets in the way when you’re trying to view the dice. I’d probably cut it back to 1″ if I was making it again.
Padded Dice Tray – If you can’t tell, I have some objections to the dice tray. I’d also like to pad it with some craft foam or neoprene mousepads or some such. This would slow the dice down once they’re in the tray and stop them from bouncing back into the tower once they hit the front. With lower walls, that would be critical.
Got a cool design? Or a question on this design? Or another question about something else entirely? Take it to the comments!
And if you enjoyed this article and want to see more like it, go to https://thirdwalling.wordpress.com and click the blue “Follow” button at the top right. We create this content for our subscribers, and if we get a lot of subscribers from a particular post, we know you liked it!


After I built this and started to use it to test dice for an upcoming article, I found that the dice weren’t always clearing the inside of the tower. I had to install a longer baffle at the bottom at a steeper angle to make it kick out every time, and keep dice from bouncing back in. I just cut the cardboard to fit, painted it, and glued it in.
you can buy sheets of self adhesive felt in a variety of colours, a single sheet was enough to pad the baffles, the tray and the top inner section of the tower – this makes the tower a lot quieter, and looks great too.
Great idea! I hadn’t considered padding the baffles – but that would certainly quiet it down.
I do like the sound for those dramatic rolls, though!
Another thing to consider: Cardboard is pretty light, and gets knocked around a bit. Mine kept getting knocked over at the table.
I glued a few heavy washers to the bottom and that seemed to help a great deal. Might be worth engineering some extra weight into the bottom somehow.
Felt for the bottom tray if you use wood. I built a dice box to roll in instead of a dice tower. I painted it with high gloss black lacquer using four coats and lined it with red felt on the inside. It turned out nicely!